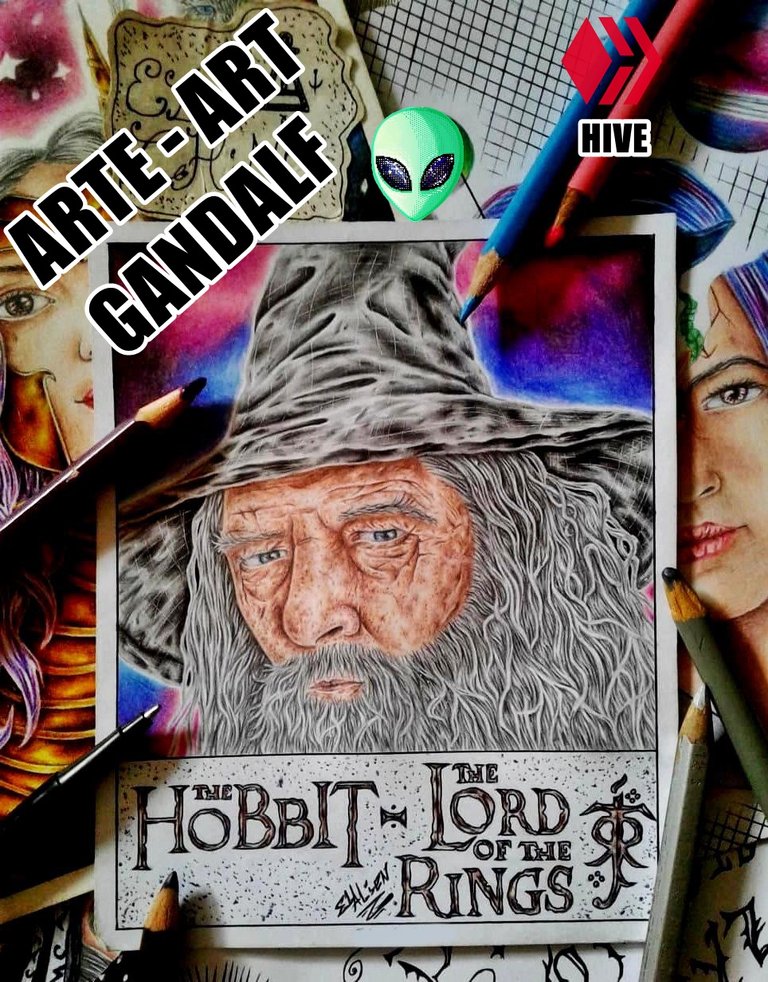
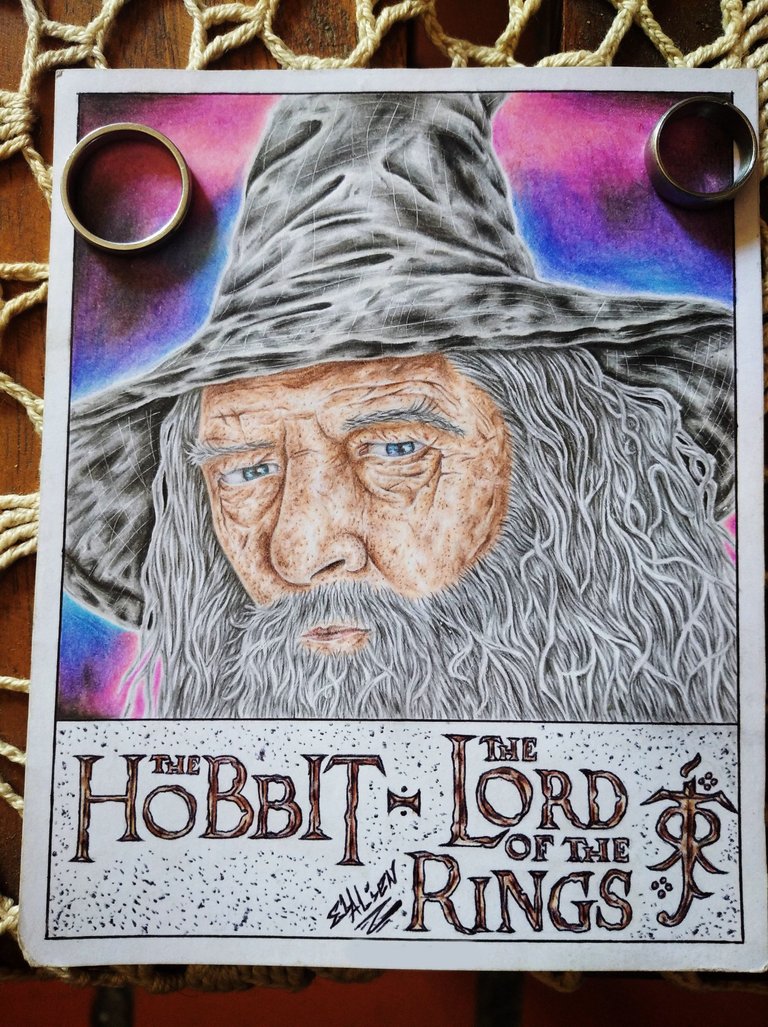
¡Arte: Gandalf - Art: Gandalf ! [ESP | ENG]
Hola a todos, Esperó se encuentren muy buen. Este día les traigo un dibujo que me tomó tiempo hacer pero valió totalmente la pena
El personaje de Gandalf, Creado por J.R.R. Tolkien quien escribió El Hobbit y El Señor De Los Anillos y que el director Peter Jackson llevo a la pantalla grande, Donde aparece el personaje de Gandalf protagonizado majestuosamente por el actor: Ian Mckellen.
Materiales:
*Lápiz HB
*Cartulina de dibujo
*Bolígrafo
*Colores Faber-Castell (48)
*Prismacolor Escolares (24)
Hello everyone, I hope you are feeling well. Today I bring you a drawing that took me some time to make but it was totally worth it.
The character of Gandalf, created by J.R.R. Tolkien who wrote The Hobbit and The Lord Of The Rings and that the director Peter Jackson took to the big screen, where the character of Gandalf appears starring majestically by the actor: Ian Mckellen.
Materials:
*HB pencil
*Drawing paper
*Ballpoint pen
*Faber-Castell colors (48)
*School Prismacolor (24)
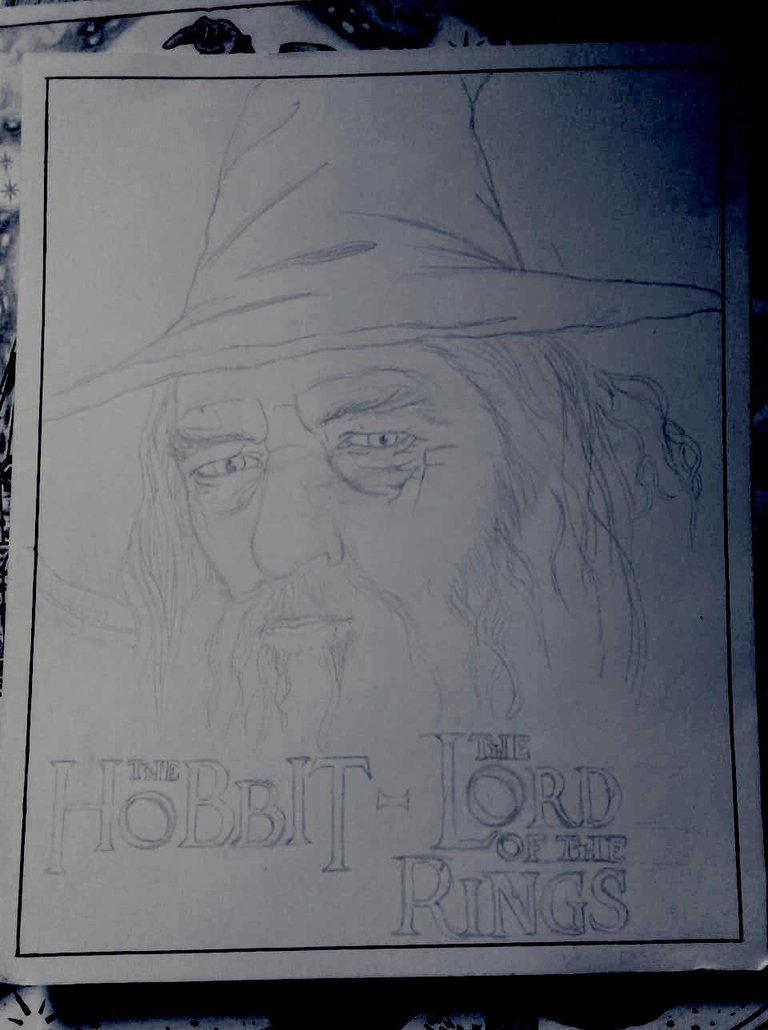
Paso 1:
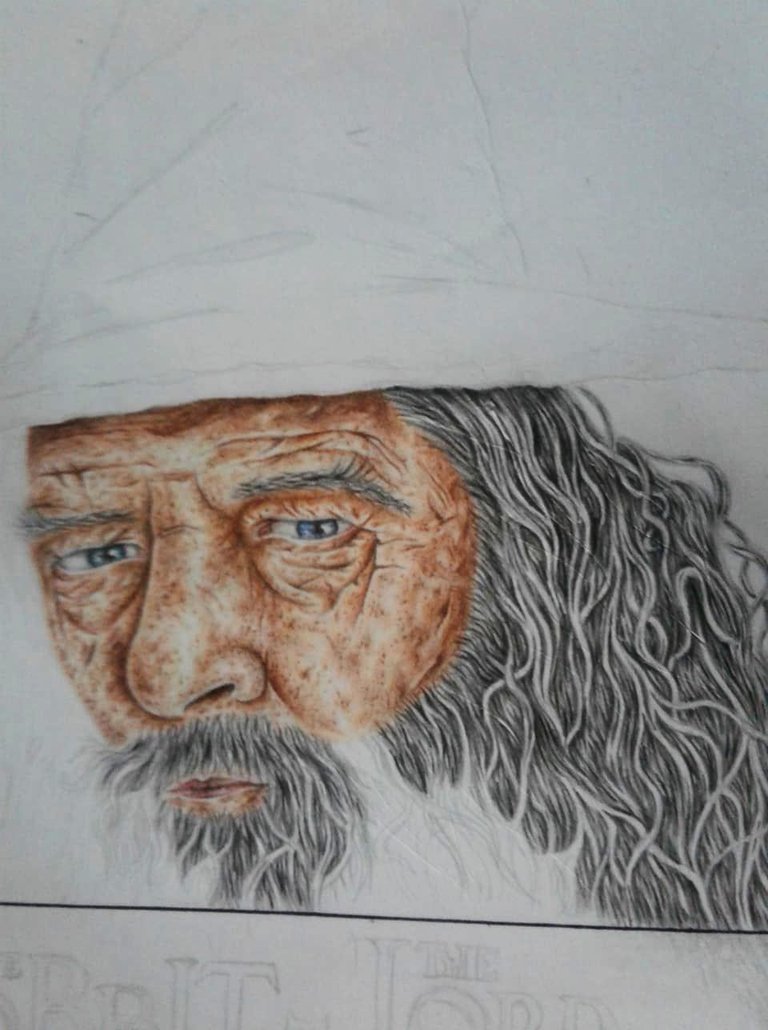
Primero comencé con el boceto utilizando el lápiz HB, Usualmente inició haciendo formas geométricas para luego darle forma y puliendo cada zona del boceto hasta lograr el resultado deseado, En este caso el boceto será algo simple ya que la mayoría de detalles se les dará en el coloreado.
Debajo del boceto coloque el nombre principal de las películas donde aparece el personaje: The Hobbit - The Lord Of The Ring y la firma caracteristica de J.R.R. Tolkien, Para finalizar realice un margen a la hoja con el bolígrafo.
Step 1:
First I started with the sketch using the HB pencil, I usually started by making geometric shapes and then shaping and polishing each area of the sketch until I achieve the desired result, In this case the sketch will be something simple since most of the details will be given in the coloring.
Below the sketch place the main name of the movies where the character appears: The Hobbit - The Lord Of The Ring and the characteristic signature of J.R.R. Tolkien, To finish make a margin to the sheet with the pen.
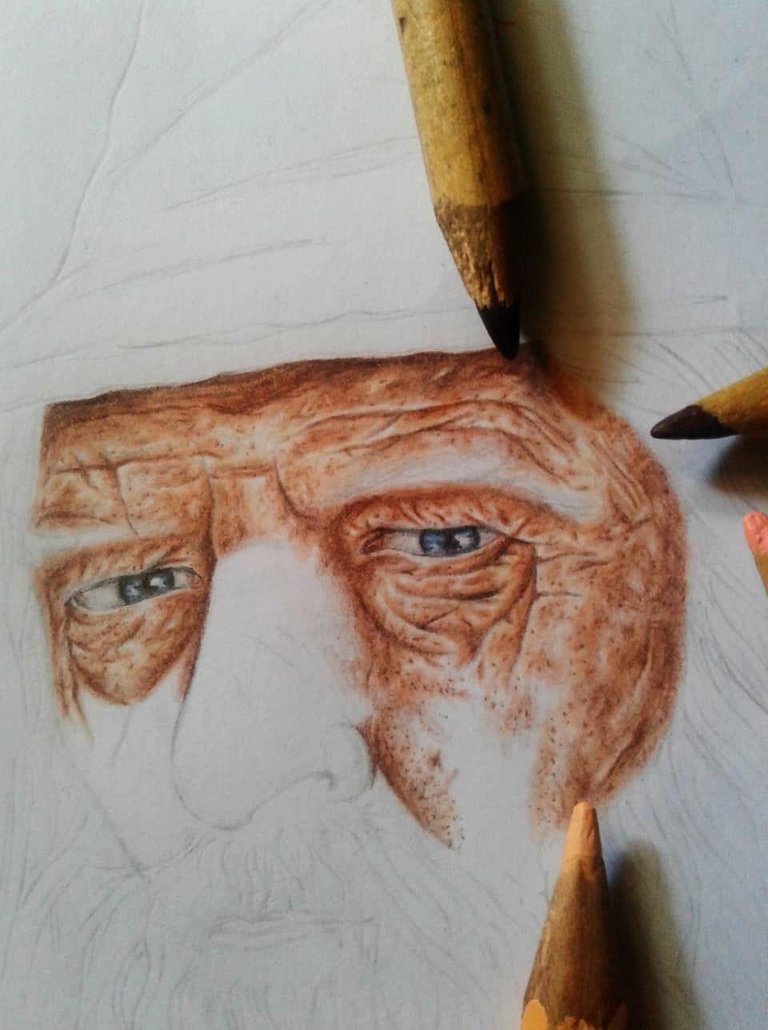
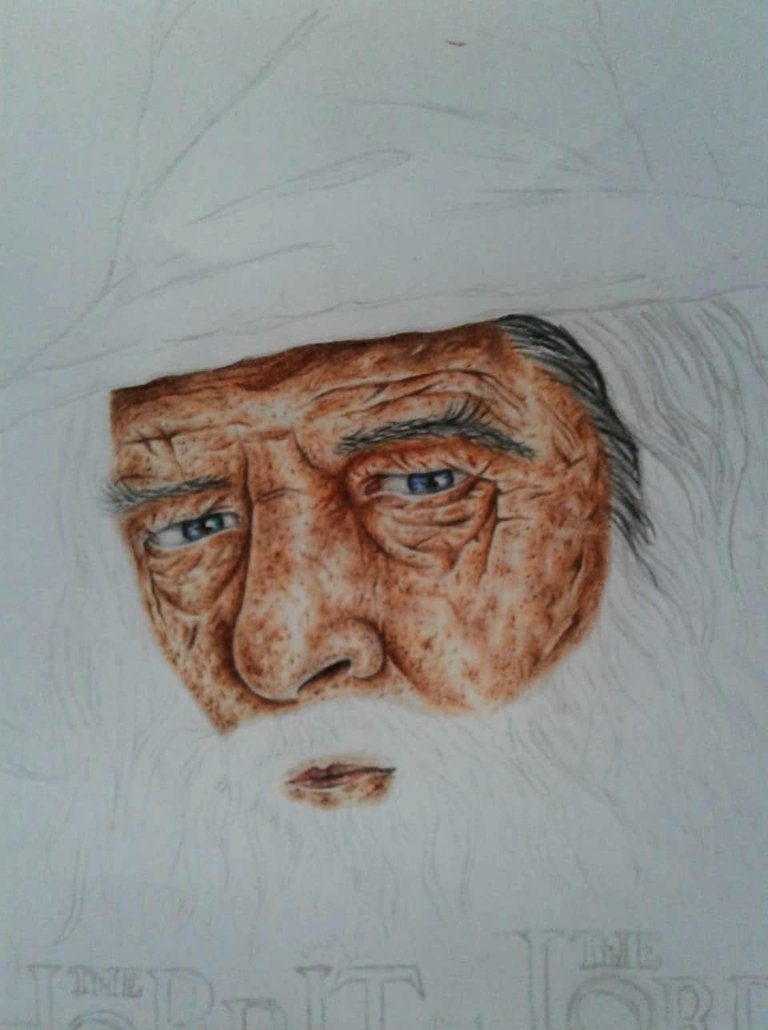
Paso 2:
Una vez finalizado el boceto lo borre levemente pero que se notara un poco. Luego inicie con coloreado en este caso el rostro en la cual utilice los siguientes colores: Café oscuro, Café claro, Marrón, Rosa claro, color carne y azul cielo. Usualmente inició coloreando los ojos allí utilice como tono base el azul cielo para luego aplicar el café oscuro alrededor del iris.
Luego continúe con la piel y ya que será un dibujo hiperrealista fui coloreando la piel por pequeñas zonas, El marrón fue el primer color que aplique o si esa zona tenía más sombra le aplicaba el café oscuro no con mucha fuerza sino levemente, Tenía bastante cuidado en donde hubieran arrugas o detalles del rostro antes de aplicar el color, Luego utilice el rosa claro para combinarlo con el tono más oscuro y finalmente en las zonas más claras aplique el color carne y así en toda la zona de la piel.
Step 2:
Once the sketch is finished erase it slightly but that it will show a little. Then start with coloring in this case the face in which use the following colors: dark brown, light brown, brown, light pink, flesh color and sky blue. Usually start by coloring the eyes where you use as a base tone the sky blue and then apply the dark brown around the iris.
Then I continued with the skin and since it will be a hyperrealistic drawing I was coloring the skin by small areas, the brown was the first color I applied or if that area had more shadow I applied the dark brown not very strongly but lightly, I was very careful where there were wrinkles or details of the face before applying the color, then use the light pink to combine it with the darker tone and finally in the lighter areas I applied the flesh color and so on the whole area of the skin.
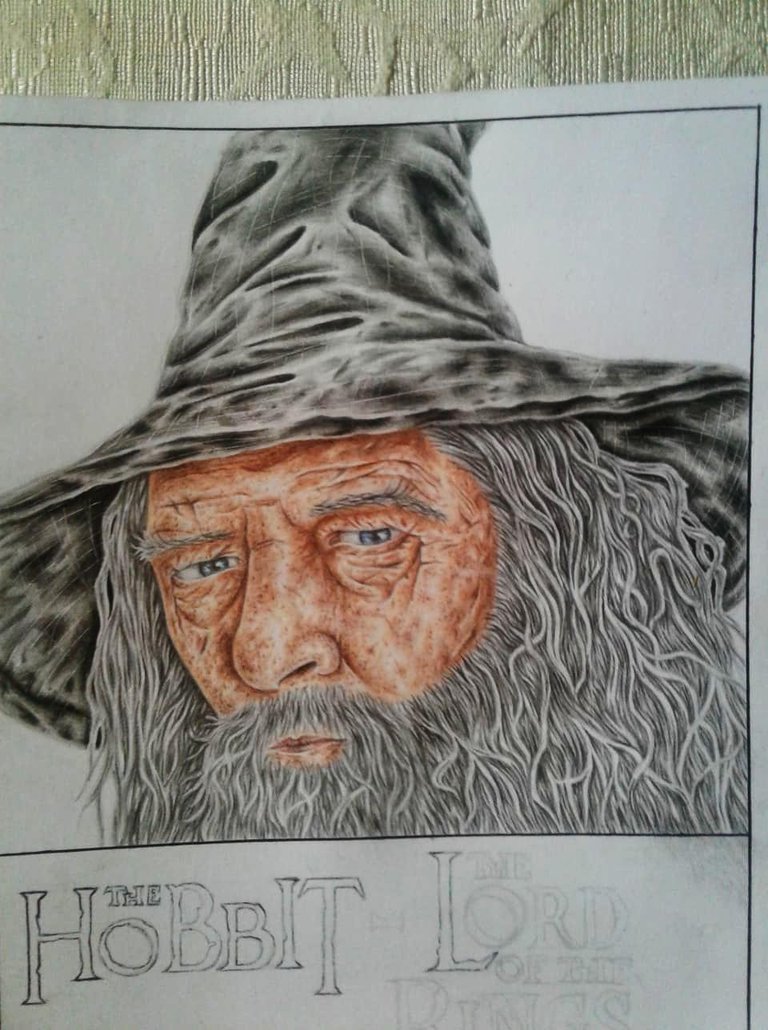
Paso 3:
Luego continúe con el cabello, Allí utilizaré los siguientes colores: Gris y negro.
Para colorear el cabello, Barba y cejas tuve que ser muy cuidadoso y cauteloso, Con el gris hice cada mechón de cabello literalmente hice cabello por cabello dándole detalles oscuros con el color negro, La idea era hacerlo lo más realista posible, El mismo procedimiento hice con la barba. Algo muy importante que hice fue dejar algunos mechones en blanco para más detalle realista.
Para la zona de las cejas inicie con el gris haciendo cada vello por vello luego con el color negro oscurecí algunos vellos para mejor detalle.
Step 3:
Then continue with the hair, There I will use the following colors: Gray and black.
To color the hair, Beard and eyebrows I had to be very careful and cautious, With the gray I did each strand of hair I literally did hair by hair giving it dark details with the black color, The idea was to make it as realistic as possible, The same procedure I did with the beard. Something very important I did was to leave some locks in white for more realistic detail.
For the eyebrows area I started with gray making each hair by hair then with the black color I darkened some hairs for better detail.
Pase 4:
Luego de haber finalizado con el cabello continué con el sombrero característico de personaje, Allí utilice los mismos colores del cabello (Gris y negro), Pero también una hojilla para darle detalle de tela a la textura. Primero use el gris para dar un tono base en todo el sombrero, Luego aplique el color negro en las zonas más oscuras y dándole un degradado entre los tonos. Por ultimo utilice la hojilla para crear líneas claras pero coherentes dándole un gran detalle de textura.
Step 4:
After having finished with the hair I continued with the character's characteristic hat, There I used the same colors of the hair (Gray and black), But also a foil to give fabric detail to the texture. First I used the gray to give a base tone throughout the hat, then I applied the black color in the darkest areas and giving a gradient between the tones. Finally use the stipple to create clear but coherent lines giving it a great texture detail.
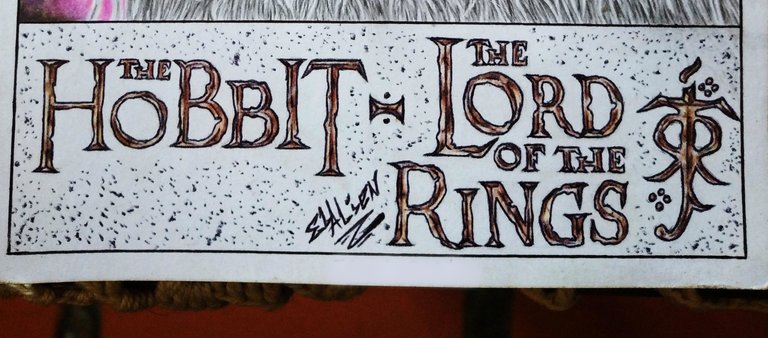
Paso 5:
Para la zona del dibujo donde están los títulos se las películas (The Hobbit - The Lord Of The Ring) Solo utilice los colores: Marrón, Café claro y una bolígrafo.
El bolígrafo lo utilice en los bordes de las letras, Luego aplique el café claro como tono base y luego le di algo más de detalle con el marrón para recrear las mismas tipografías utilizadas en las películas.
Step 5:
For the area of the drawing where the titles of the movies are (The Hobbit - The Lord Of The Ring) I only used the colors: Brown, Light brown and a ballpoint pen.
I used the pen on the edges of the letters, then I applied the light brown as a base tone and then I gave some more detail with the brown to recreate the same typographies used in the movies.
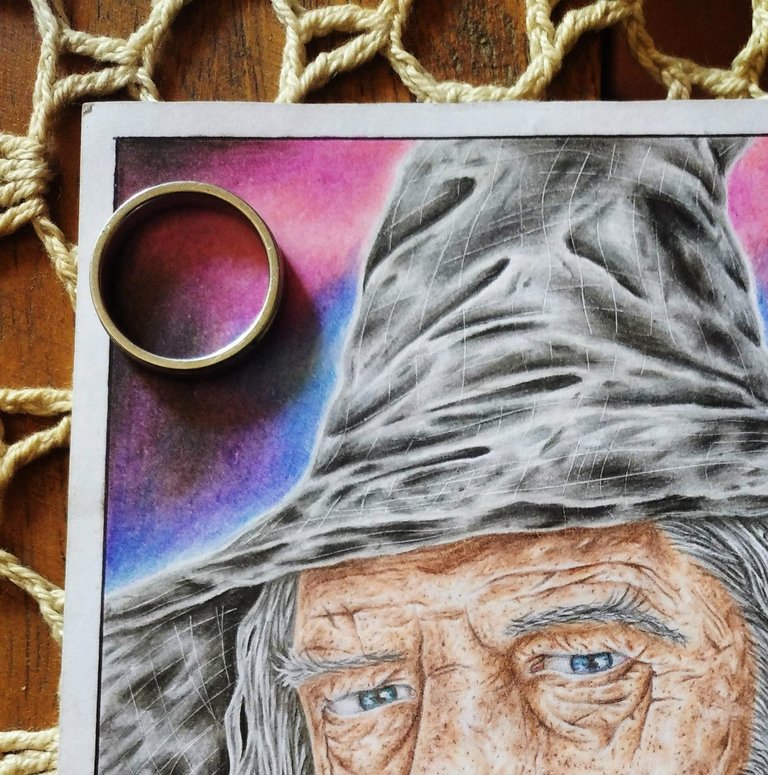
Paso 6:
Para el fondo pensé hacer algo espacial como una nebulosa, Y eso mismo hice, Para eso usé los siguientes colores: Negro, Mora, Morado, Azul marino y azul cielo. Aquí combine los colores de manera aleatoria pero principalmente utilice el color negro en los bordes para luego mezclarlo con otro tono como el morado o azul creando un hermoso degradado.
Step 6:
For the background I thought to do something spatial like a nebula, And that's what I did, For that I used the following colors: black, purple, purple, navy blue and sky blue. Here I combined the colors in a random way but mainly I used the black color in the edges and then I mixed it with another tone like purple or blue creating a beautiful gradient.
0
0
0.000
Hermosa ilustración me encantó, tienes un talento increíble.
¡Muchísimas gracias chica! Me alegra que le haya encantado 👽✨
Quedó hermoso este dibujo, aplicas el realismo muy pero muy bien. De verdad que me gustó y esa es una de mis películas favoritas jejeje saludos!
¡Muchísimas gracias chica @valeryb ! Así es le dedique bastante tiempo para lograr un buen resultado, Que agrado que le haya gustado🖤. Es de mis películas y libros favoritos también 🧙🏻♂️
I N C R E I B L E M E N T E
F A N T A S T I C O ✨
Que bonito trabajo, y los detalles son geniales. Gran trabajo @alien-boy . Se nota tu dedicación y esmero! Éxito en tu post!
🌼 Me agrado mucho su entusiasmo en las palabras de arriba ✨ @maridmc
¡Muchísimas gracias chicas! Así es le dedique el tiempo suficiente para que el resultado final fuera MAGNIFICO. Feliz día y gracias 👽🪐
!discovery 35
This post was shared and voted inside the discord by the curators team of discovery-it
Join our Community and follow our Curation Trail
Discovery-it is also a Witness, vote for us here
Delegate to us for passive income. Check our 80% fee-back Program
Congratulations @alien-boy! You have completed the following achievement on the Hive blockchain And have been rewarded with New badge(s)
Your next target is to reach 600 upvotes.
You can view your badges on your board and compare yourself to others in the Ranking
If you no longer want to receive notifications, reply to this comment with the word
STOP🖤👽🪐
MAGNIFICO